

CSS Selectors are used to find specific HTML elements in the webpage and style them accordingly.These are commonly used selectors.
- Universal Selector(*)
- Individual Selector()
- Class and id Selector(. and #)
- And Selector(Chained)
- Direct Child(>)
- Descendant Selector(space)
- Sibling Selector(+ or ~)
- Pseudo Selector(Before and After).
Let us understand all of these selectors with examples.
Universal Selector
Universal Selector is needed when we want to apply some changes through out the page. It is denoted by * symbol. Example:
*{
padding:0;
margin:0;
background-color:green;
}
So this code will make the content of a page starting without any default space from the beginning and will make the background colour as green.
Individual Selector
Individual selector is used to apply style to any specific tag used in the page. Example:
p{
color:blue;
}
This code will make all the paragraph(<p></p> tag) font colour as blue in the page.
Class and id Selector
This is the most commonly used selector.
class selector:
To select an element with specific class or group of elements having same class name and style it, we use class selector. class selector is denoted with period(.) character. Example:
.section2{
color:red;
font-size: 14px;
}
This code will find the elments with attribute class ="section2" and style its font by changing its colour and size.
id selector:
To select an element with unique id and style it, we use id selector. idselector is denoted with hash(#) character. Example:
#main{
background-color:yellow;
font-size: 14px;
}
This code will find the elments with attribute id="main" and style its font by changing its background colour and size.
And Selector(Chained)
This selector helps in targeting specific class underlying under specific tag. Example:
<ul>
      <li class="class1 item1">item1</li>
      <li class="class1">item2</li>
      <li >item3</li>
      <li >item4</li>
      <li>item5</li>
    </ul>
In the above html code . If we want to target only the li element having class name as "class1" and "item1" then we can do it using and selector as shown below.
li.class1.item1{
        background-color: #000;
        color: #ef9323;
      }
This code will only change the 1st li element having both the class names.
Direct Child
We can select and apply style to the element which is direct child of the parent element.The child combinator (>) is placed between two CSS selectors. Example:
<div>
      <p>lorem</p>
      <li>awesome
        <p>Lorem ipsum dolor sit, amet consectetur adipisicing elit. Eligendi, quos?</p>
        <p>Lorem ipsum dolor sit amet consectetur adipisicing elit. Dolorum mollitia maiores dicta maxime odit doloremque.</p>

      <ul>
</div>
Here we have 3 direct child of <div> tag i.e. <p> <li> <ul>.And further we have child of <li>awesome i.e <p>Lorem ipsum.....
So if we want to select the direct child of div with li and further we want to select direct child of that li i.e we use the below code.
div > li > p {
        background-color: yellow;
      }
This will effect only the two <p> tags that are direct child of li.
Descendant Selector
The descendant selector matches all elements that are descendants of a specified element. The following example selects all
elements inside
div p {
  background-color: yellow;
}
Sibling Selector
Sibling selector is used to target element next to the one apply the style for.Sibling elements must have the same parent element.
Adjacent Sibling Selector(+):
The adjacent sibling selector is used to select an element that is directly after another specific element. Example:
<section>
      <p class="sibling">Test 1</p>
      <p >Test 2</p>
      <p>Test 3</p>
      <p >Test 4</p>
      <p>Test 5</p>
    </section>
So here if we use Adjacent sibling selector on class="sibling" then only the next element i.e <p >Test 2</p> will be effected.We can do this by following code.
.sibling + p {
        background-color: pink;
      }
General Sibling Selector(~):
This selector will select all the elements after the targeted element instead of only the next one.
For the same HTML example we used for adjacent sibling selector. We can use ~ selector as shown below.
.sibling ~ p {
        background-color: pink;
      }
This code will effect all the next sibling of the element with class='sibling'. i.e <p >Test 2</p>
<p>Test 3</p>
<p >Test 4</p>
<p>Test 5</p>.
Pseudo Selector(Before and After)
Pseudo Selector can be used to style or insert content before, or after, the content of an element.
Before Selector
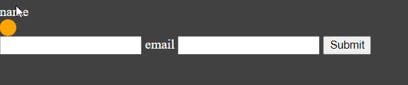
Lets understand before selector with an example. As shown in the image below if we want something to appear above the name field. Only when someone hovers over it (not when the page is rendered). we cab use before selector .

<form action="">

        <label class="imp-label" for="name">name</label>
        <input type="text" name="name" />

        <label for="email">email</label>
        <input type="text" name="email" />

        <button data-tooltip="Tooltip" type="submit">Submit</button>
      </form>
Here we need to apply before selector on the class="imp-label" as it corresponds to name.We can do that by.
.imp-label:hover::before{
        content: '';
        display: block;
        width: 20px;
        height: 20px;
        border-radius: 10px;
        background-color: orange;
      }
Using this code an orange circle will appear above name field as a block element(occupying space for the whole line after that element) only when we hover over name.
Result:

After Selector
It will do just opposite to whatever we have seen for before selector.
.imp-label:hover::after{
        content: '';
        display: block;
        width: 20px;
        height: 20px;
        border-radius: 10px;
        background-color: orange;
      }
Result: